No products in the basket.
Contents
- What is a Session Box / Red Box & why is it useful?
- How do I create a Session Box?
- How to set Session Box LED feedback?
- How do I add Session Box Navigation controls?
- How do I create mixer controls which move with the Session Box?
- How do I link Session boxes from different MIDI remote scripts together?
- Why isn’t my Session box working?
- How do I display the clip colours from Ableton Live on my controller?
What is a Session Box / Red Box & why is it useful?
The size of an Ableton Live Project can vary anywhere from 1 track to 1000, that’s one of the wonders of modern software. Your hardware however, doesn’t have that luxury. If you have a controller which is designed to control 8 tracks, then 8 tracks is the maximum it can control.
Session boxes are a genius concept. Also known as the ‘Red Box clip grid’ and first introduced by the Akai APC40, when you have one activated, you will see a coloured box wrapped around a grid of clips in your Ableton Live project.

The idea is that your MIDI controller will control whatever is contained within this box and when you move the Session box, the tracks, scenes & clips which you have access to, will automatically update and move with it around your project.
Adding a Session Box means you can remove the limitations of a physical MIDI controller and have the ability to access every track and scene in your project.
How do I create a Session Box?
With the Remotify App you can easily create a custom size Session box for your MIDI Controller.
Hop into the App (http://remotify.io/app#/list), click add ‘Add a new mapping’ then click ’Session Box’.
A Pro account is required to add a Session Box in your script, go here for more details and to upgrade
Customising the size of your Session Box
Scroll down slightly and you will see a visual representation of an Ableton Project, complete with a red box which represents the Session Box. By default you will see it is set to be 2 tracks in width and 4 scenes in height.
To change these settings, go to the option ‘Width, Height’ above. Change the selected options from ‘2 and 4’ to your own requirements and you will see the box update to match.
Mapping your clip controls
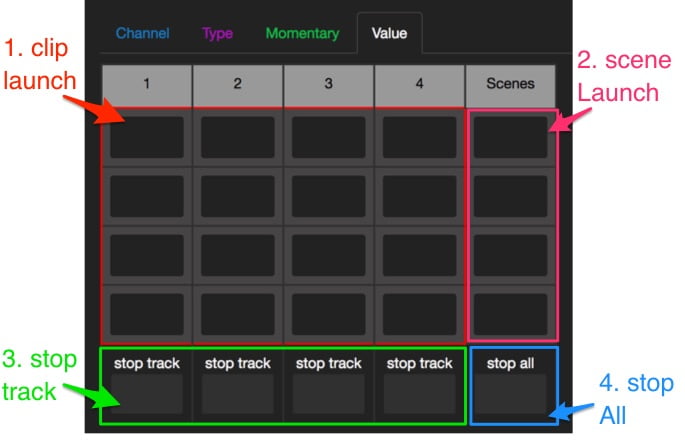
Each black box represents a clip control,
the boxes within the red box are for launching clips,
the boxes under ‘Scenes’ are for scene launch,
‘stop track’ for stopping the track above,
‘stop all’ stops all currently playing tracks.

Mapping a control on your MIDI Controller to a Session Box clip works in the same way as MIDI Mapping any other control. Make sure your Controller is connected and hit ‘MIDI Learn’.
if you haven’t done so yet, I recommend you read how to make your first MIDI remote script
Click into the first black square and, you will see it highlight and your cursor appear.
Now press a button on your controller and you will see its MIDI value appear in the box.
Repeat this for all of the black boxes – you can use tab and alt+tab on your keyboard to quickly move left & right.
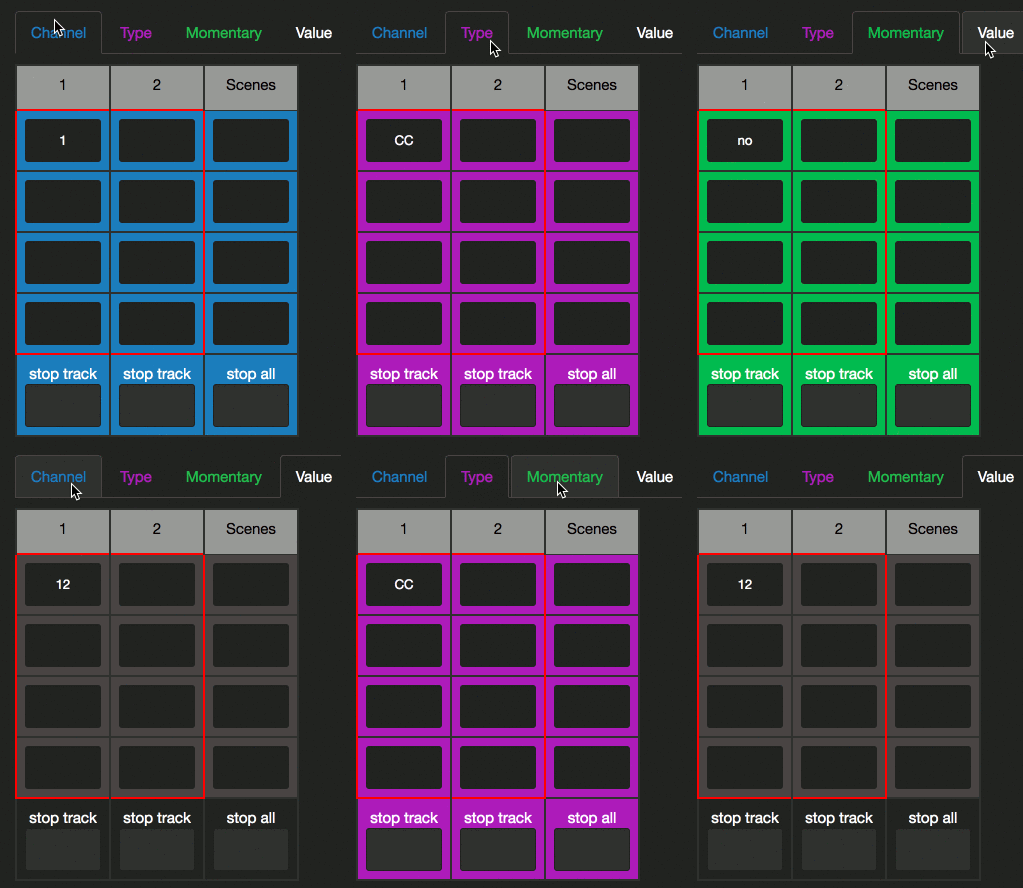
Channel, type, Momentary, Value
Each of these represent the different pieces of each MIDI message that your mapping. You can click on them to see the values that have been input and change them if you need to.
Notice the the colour change of the table below & so that you don’t get confused, remember that black is the MIDI value!

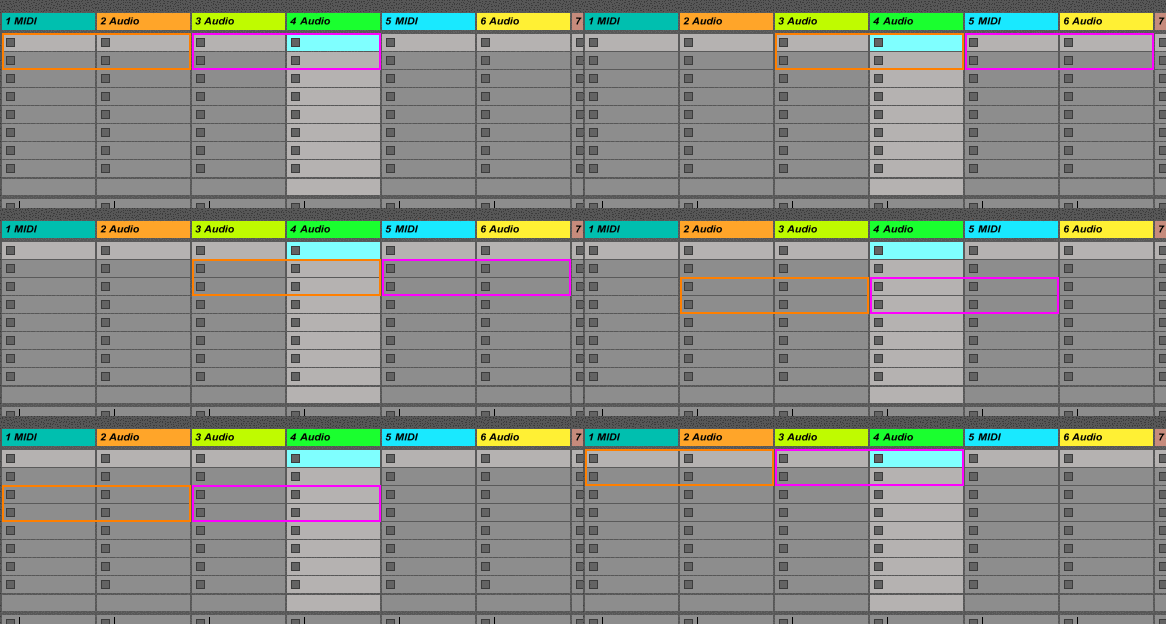
What is Session Box Offset?
When your Session Box first loads, the Session Box offset settings are taken into account when placing the box on the screen of Ableton Live.
The Offset option of the Session Box mapping is where you can choose these settings. The values offset the Session Box from the top left corner of the project, settings both to 0 means that Session box will be placed at the top left corner.

What’s the difference between 0 and ’n/a’?
This will only make a difference if your script has multiple modes. If you switch modes and your Session Box is set to n/a then it will stay in the same place it is was last in.
If you make the offset 0 then the Session Box will jump to the 0 position each time its mode activates.
Initial Sessionbox offset
On the Mapping List page, you’ll also see an option for ‘Initial Sessionbox offset’
This allows you to set a position for the Session Box to load to when the script first initialises and have individual Session Boxes set to ’n/a’ so they stay in their current position.
What is Combination Mode?
When Combination Mode is turned on, your Session Box will basically ‘stick’ to other Session Boxes from totally different MIDI Remote Scripts that also have this option turned on.
This allows you to move multiple Session boxes together as though they are one.

For more info on using Session Box with Combination Mode, Offset & Modes, watch this video:
That’s your basic Session Box created, if you download & install the script you’ll now have a working Session Box script complete with a coloured box in the Live display and full clip launch control,
but there’s a lot more you can do with it…
How to set Session Box LED feedback?
Below the Session Box visualisation you will see the LED feedback box. Each input box represents a different Session Box related event that can occur in Ableton Live. The value you enter for each of these are velocity values that your MIDI Controller uses to display a certain colour. Each controller has its own set of velocity > colour settings.
You can find more details on setting LEDs for your Session Box here Custom LED feedback for your Session Box
How do I add Session Box Navigation controls?
Having the ability to move a Session Box around your Live project is one its biggest benefits.
So lets add this functionality to your script.
On the mapping type page, next to Session, click ‘Session Box navigation’
Keep the mode option on ‘1′
Each direction needs to be created individually, next to ‘Direction’ make your selection.
‘Move by’ has 2 options, ‘1′ and ‘page’. 1 means that your session box will move 1 track or scene and ‘page’ means it will shift by its entire width or height. So if the Session Box is 4 tracks in width and you set it to move right, each time you press mapping on your controller, the session box will move by 4 tracks.
For LED on/off values, your control will light up if you have space to move in the selected direction and will be off if the Session Box can’t move any further.
How do I create mixer controls which move with the Session Box?
You will probably want to add mixer controls to your MIDI script which will automatically update and move with your Session box. This is super simple in the Remotify App.
When you have an active Session Box in your script, the ‘specific’ track Type option becomes relative to it. Meaning if you have a Volume mapping set to track 2, it will automatically mean track 2 within the Session box. For example, if you have a 4 track Session box and you’ve moved it to track 9 – 16 then your track 2 Volume mapping will now control track 10 (which is still track 2 inside your Session Box).
This can be done for all mixer mappings: Volume, Pan, Mute, Solo, Arm, Send.
How do I link Session boxes from different MIDI remote scripts together?
This is done using Combination mode detailed above.
Why isn’t my Session box working?
Session Box requires a minimum of Ableton 9.1.3,
if you are using a later version but still don’t see it appear in your Ableton Live project:
1. Make sure you have installed your script correctly, read this tutorial on how to install MIDI Remote Scripts
2. And this tutorial how to debug and fix your MIDI Remote Script
How do I display the clip colours from Ableton Live on my controller?
We currently only have this available for the Launchpad Pro.
You will need to add a few lines of code direct to your MIDI Remote Script.
Contact us to get the code.
